
How to Create a Spring Boot REST API

Spring Boot allows you to easily generate a project to create REST APIs.
This article will show you how to create a REST API with Spring Boot from scratch.
Prerequisites
Maven 3+.
MySQL Workbench 8+.
Postman v9+.
1. Generate the Project
Go to the website Spring Initializr to initialize the Spring Boot project. Add the following dependencies:
Spring Boot DevTools: for the development tools.
Lombok: to reduce boilerplate code (for example, getters and setters).
Spring Web: to embed Apache Tomcat and include Spring MVC.
Spring Data JPA: to facilitate the database layer.
MySQL Driver: to enable communication between the Spring Boot application and the database.

Select "Generate" and then import the project onto your IDE as a Maven project.
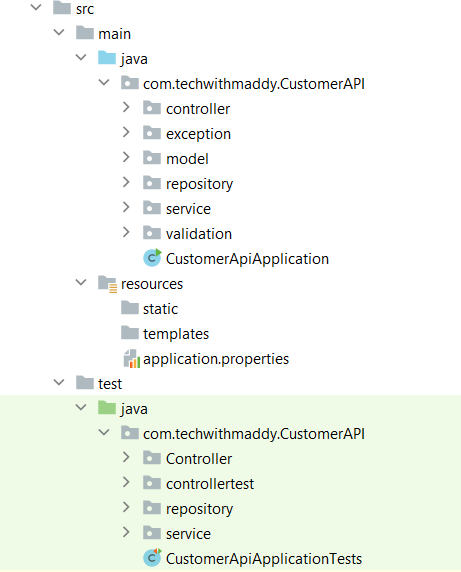
The package structure looks like the following:
The pom.xml should look like this:
<?xml version="1.0" encoding="UTF-8"?>
<project xmlns="http://maven.apache.org/POM/4.0.0" xmlns:xsi="http://www.w3.org/2001/XMLSchema-instance"
    xsi:schemaLocation="http://maven.apache.org/POM/4.0.0 https://maven.apache.org/xsd/maven-4.0.0.xsd">
    <modelVersion>4.0.0</modelVersion>
    <parent>
        <groupId>org.springframework.boot</groupId>
        <artifactId>spring-boot-starter-parent</artifactId>
        <version>2.4.12</version>
        <relativePath/> <!-- lookup parent from repository -->
    </parent>
    <groupId>com.techwithmaddy</groupId>
    <artifactId>CustomerAPI</artifactId>
    <version>0.0.1-SNAPSHOT</version>
    <name>CustomerAPI</name>
    <description>Demo project for Spring Boot</description>
    <properties>
        <java.version>1.8</java.version>
        <maven.compiler.source>1.8</maven.compiler.source>
        <maven.compiler.target>1.8</maven.compiler.target>
    </properties>
    <dependencies>
        <dependency>
            <groupId>org.springframework.boot</groupId>
            <artifactId>spring-boot-starter-data-jpa</artifactId>
        </dependency>
        <dependency>
            <groupId>org.springframework.boot</groupId>
            <artifactId>spring-boot-starter-validation</artifactId>
        </dependency>
        <dependency>
            <groupId>org.springframework.boot</groupId>
            <artifactId>spring-boot-starter-web</artifactId>
        </dependency>
        <dependency>
            <groupId>javax.validation</groupId>
            <artifactId>validation-api</artifactId>
            <version>2.0.1.Final</version>
        </dependency>
        <dependency>
            <groupId>org.springframework.boot</groupId>
            <artifactId>spring-boot-devtools</artifactId>
            <scope>runtime</scope>
            <optional>true</optional>
        </dependency>
        <dependency>
            <groupId>mysql</groupId>
            <artifactId>mysql-connector-java</artifactId>
            <scope>runtime</scope>
        </dependency>
        <dependency>
            <groupId>org.projectlombok</groupId>
            <artifactId>lombok</artifactId>
            <optional>true</optional>
        </dependency>
        <dependency>
            <groupId>org.springframework.boot</groupId>
            <artifactId>spring-boot-starter-test</artifactId>
            <scope>test</scope>
        </dependency>
        <dependency>
            <groupId>com.h2database</groupId>
            <artifactId>h2</artifactId>
            <scope>test</scope>
        </dependency>
        <dependency>
            <groupId>org.junit.jupiter</groupId>
            <artifactId>junit-jupiter-engine</artifactId>
            <version>5.1.0</version>
            <scope>test</scope>
        </dependency>
        <dependency>
            <groupId>junit</groupId>
            <artifactId>junit</artifactId>
            <scope>test</scope>
        </dependency>
        <dependency>
            <groupId>junit</groupId>
            <artifactId>junit</artifactId>
            <scope>test</scope>
        </dependency>
    </dependencies>

    <build>
        <plugins>
            <plugin>
                <groupId>org.springframework.boot</groupId>
                <artifactId>spring-boot-maven-plugin</artifactId>
                <configuration>
                    <excludes>
                        <exclude>
                            <groupId>org.projectlombok</groupId>
                            <artifactId>lombok</artifactId>
                        </exclude>
                    </excludes>
                </configuration>
            </plugin>
        </plugins>
    </build>

</project>
2. Database Configuration
Configure the database to allow for communication between the Spring Boot REST API and the database.
The script below should go inside the application.properties under src/main/resources.
spring.datasource.url = jdbc:mysql://localhost:3306/customer-management-system
spring.datasource.username = root
spring.datasource.password = Connection
spring.jpa.hibernate.ddl-auto = update
spring.jpa.properties.hibernate.dialect = org.hibernate.dialect.MySQL5Dialect

server.error.include-stacktrace = never

server.port = 8083
3. Create a Mysql Database Table
Create a database schema called customer-management-system.
Run the query below to create a Customer table.
CREATE TABLE Customer (
    id INT NOT NULL AUTO_INCREMENT,
    first_name VARCHAR(100),
    last_name VARCHAR(100),
    email VARCHAR(100),
    phone_number VARCHAR(255),
    PRIMARY KEY (customer)
);
4. Create a Model Class
The model class is a class that represents a real-world object. It's responsible for storing and retrieving the data.
Instead, the entity class is a Java class mapped to a database table, and each field corresponds to a database column. Read this Quora discussion if you'd like to know more about the difference between a model and an entity.
In the example below, you created a Customer model and linked each Java field to the columns in the database.
NOTE:
The @ Data is a Lombok annotation that puts together getters, setters, toString method, equals, hashcode, etc.
The @ Column must match the name of the columns in the database.
package com.techwithmaddy.CustomerAPI.model;

import lombok.Data;

import javax.persistence.Column;
import javax.persistence.Entity;
import javax.persistence.GeneratedValue;
import javax.persistence.GenerationType;
import javax.persistence.Id;
import javax.persistence.Table;

@Entity
@Table(name = "Customer")
@Data
public class Customer {

    @Id
    @GeneratedValue(strategy = GenerationType.AUTO)
    @Column(name = "id")
    private Integer id;

    @Column(name = "first_name")
    private String firstName;

    @Column(name = "last_name")
    private String lastName;

    @NotEmpty
    @Email
    @Column
    private String email;

    @Column(name = "phone_number")
    private String phoneNumber;

}
5. Create a Customer Repository Interface
The repository is an interface responsible for performing database query operations. It extends the JPA Repository, which has CRUD operations built in.
The type arguments are Customer, the domain class that will be managed and Integer, which is the type of id of the domain class.
In this interface, you create a method to find a customer via email.
NOTE: @ Query is a Spring Data JPA annotation used to create customized database queries.
package com.techwithmaddy.CustomerAPI.repository;

import com.techwithmaddy.CustomerAPI.model.Customer;
import org.springframework.data.jpa.repository.Query;
import org.springframework.data.repository.CrudRepository;

public interface CustomerRepository extends CrudRepository<Customer, Integer> {

    @Query("SELECT c FROM Customer c WHERE c.email =:email")
    Customer findCustomerByEmail(String email);

}
6. Create a Service Class
The service class is responsible for defining an application's business logic.
The service class communicates with the repository (and the controller, which you'll build later).
For Dependency Injection, Spring can use auto-wiring. With the Autowired annotation, Spring will search for a class that matches the property by type and automatically inject the object.
In the service class, we have two methods:
saveCustomer(): This is going to save the customer into the database. The good thing about extending the CRUD repository is that it provides built-in CRUD functions(such assave()), so you don't need to explicitly define them in the service class.getCustomerByEmail(): This is going to retrieve the customer using their email. I used theOptionalto handle a possibleNullPointerException(what if the email we type doesn't exist?).
package com.techwithmaddy.CustomerAPI.service;

import com.techwithmaddy.CustomerAPI.model.Customer;
import com.techwithmaddy.CustomerAPI.repository.CustomerRepository;
import org.springframework.beans.factory.annotation.Autowired;
import org.springframework.stereotype.Service;
import org.springframework.transaction.annotation.Transactional;

import java.util.Optional;

@Service
public class CustomerService {

    @Autowired
    private CustomerRepository customerRepository;

    public Customer saveCustomer(Customer savedCustomer) {
        Customer customer = new Customer();
        customer.setFirstName(savedCustomer.getFirstName());
        customer.setLastName(savedCustomer.getLastName());
        customer.setEmail(savedCustomer.getEmail());
        customer.setPhoneNumber(savedCustomer.getPhoneNumber());
        return customerRepository.save(savedCustomer);
    }

    public Optional<Customer> getCustomerByEmail(String email){
        Customer customer = customerRepository.findCustomerByEmail(email);

        return Optional.ofNullable(customer);
    }

}
7. Create a Custom Exception
Along with the service class, you create a CustomerNotFoundException class that you will use to throw an Exception in case a customer doesn't exist.
package com.techwithmaddy.CustomerAPI.exception;

import org.springframework.http.HttpStatus;
import org.springframework.web.bind.annotation.ResponseStatus;

@ResponseStatus(HttpStatus.NOT_FOUND)
public class CustomerNotFoundException extends RuntimeException {
    public CustomerNotFoundException(){
        super("Customer Not Found");
    }
}
8. Create a Controller Class
The controller class is responsible for handling the requests coming from the client.
This controller is where you explicitly say that this application is a REST API, thanks to the @RestController annotation. This class will handle the requests.
Then, we use the RequestMapping, which is the parent annotation of all the other mappings.
In this class, we have two methods:
saveCustomer(): this method saves the information of the customer into the database. We make use of the POST request to create new data.
We write the POST request like this:
http://localhost:8083/customer/save
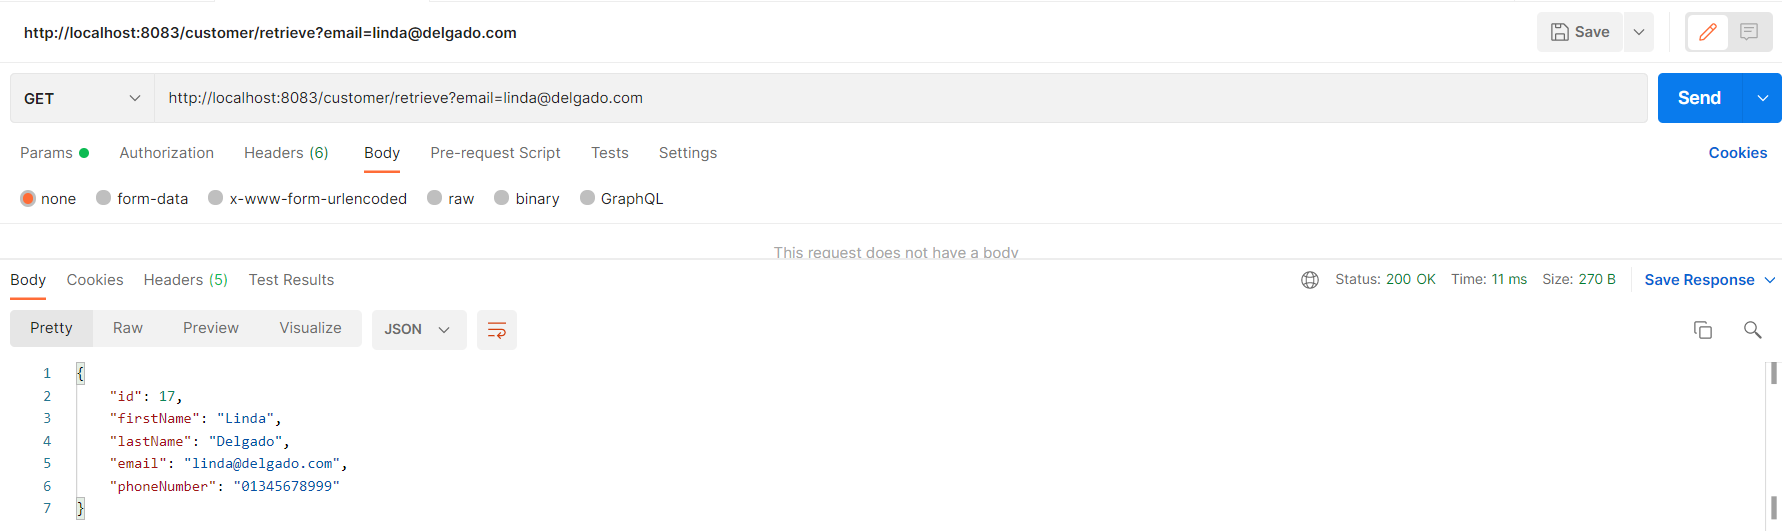
getCustomerByEmail(): this method retrieves data from the database using the email. If the email doesn't exist, then we throw a CustomerNotFoundException.
We write the GET request like this:
http://localhost:8083/customer/retrieve
package com.techwithmaddy.CustomerAPI.api;

import com.techwithmaddy.CustomerAPI.exception.CustomerNotFoundException;
import com.techwithmaddy.CustomerAPI.model.Customer;
import com.techwithmaddy.CustomerAPI.service.CustomerService;
import org.springframework.beans.factory.annotation.Autowired;
import org.springframework.http.MediaType;
import org.springframework.web.bind.annotation.RequestBody;
import org.springframework.web.bind.annotation.RequestMapping;
import org.springframework.web.bind.annotation.RequestParam;
import org.springframework.web.bind.annotation.ResponseBody;
import org.springframework.web.bind.annotation.RestController;

import javax.validation.Valid;

import static org.springframework.web.bind.annotation.RequestMethod.GET;
import static org.springframework.web.bind.annotation.RequestMethod.POST;

@RestController
@RequestMapping(value = "/customer")
public class CustomerController {

    @Autowired
    private CustomerService customerService;

    @RequestMapping(method = {POST}, path = "/save", produces = MediaType.APPLICATION_JSON_VALUE)
    @ResponseBody
    public Customer saveCustomer(@Valid @RequestBody Customer customer){
        return customerService.saveCustomer(customer);
    }

    @RequestMapping(method = {GET}, path = "/retrieve")
    @ResponseBody
    public Customer getCustomerByEmail(@RequestParam String email){
        return customerService.getCustomerByEmail(email).orElseThrow(CustomerNotFoundException::new);
    }

}
9. Create a Validation Handler Class
This class allows us to customize the response we're going to receive on Postman.
You can read more about this class here.
package com.techwithmaddy.CustomerAPI.validation;

import org.springframework.http.HttpHeaders;
import org.springframework.http.HttpStatus;
import org.springframework.http.ResponseEntity;
import org.springframework.validation.FieldError;
import org.springframework.web.bind.MethodArgumentNotValidException;
import org.springframework.web.bind.annotation.ControllerAdvice;
import org.springframework.web.context.request.WebRequest;
import org.springframework.web.servlet.mvc.method.annotation.ResponseEntityExceptionHandler;

import java.util.HashMap;
import java.util.Map;

@ControllerAdvice
public class ValidationHandler extends ResponseEntityExceptionHandler {

    @Override
    protected ResponseEntity<Object> handleMethodArgumentNotValid(MethodArgumentNotValidException ex,
                                                                  HttpHeaders headers, HttpStatus status, WebRequest request) {

        Map<String, String> errors = new HashMap<>();
        ex.getBindingResult().getAllErrors().forEach((error) -> {

            String fieldName = ((FieldError) error).getField();
            String message = error.getDefaultMessage();
            errors.put(fieldName, message);
        });
        return new ResponseEntity<Object>(errors, HttpStatus.BAD_REQUEST);
    }
}
10. Testing with Postman
Test the application using Postman.
Add a couple of customers.
Enter the body of the request:
{
    "firstName": "Steve",
    "lastName": "Austin",
    "email": "steve@austin.com",
    "phoneNumber": "01223344556"
}
Select SEND, and Steve Austin will be saved into the database.

Let's try again with another customer.
{
    "firstName": "Linda",
    "lastName": "Delgado",
    "email": "linda@delgado.com",
    "phoneNumber": "01345678999"
}
Linda Delgado is also saved in our database.

On Postman, you should get a 200_OK status response.

Let's see the scenario when:
the phone number is less or greater than 10.
the email address is invalid.

As you can see, we get a customized error message.
Now that you know how to save a customer and have a couple of customers saved in our database, you can make a GET request to retrieve a customer via email.
Let's retrieve the customer, Steve.

And now Linda.
If you try to retrieve a customer that doesn't exist, we get a 404 Not Found status code, as we should expect.

Some tips when you create your own application:
Follow the recommended Spring Boot package structure.
Running
mvn clean installhelps clean the dependencies and build the project in case you remove or rename a resource from the directory.Ensure that you select the right imports.
Ensure that Postman accepts
application/jsonto avoid415 Unsupported Media Type.Ensure that you set the database schema as
default schema.
CONCLUSION
This tutorial taught you how to create a Spring Boot REST API.
You have:
Generated a Spring Boot project.
Created a database.
Linked the application to the database.
Created a RestController, Service and a Repository.
Created a Custom Exception.
Used Postman to test the REST API.
If you ever want to play with the application, you can clone the GitHub repository here.
Thanks for reading my article. Until next time! 👋🏾
ADDITIONAL RESOURCES: