

Replace a JPA entity with a DTO
Search for a command to run...
Hi Maddy,
I wonder how an public CustomerDTO updateCustomer(CustomerDTO customerDTO) would be implemented by you?
My straight forward solution would be:
public CustomerDTO updateCustomer(CustomerDTO customerDTO)
{
   Customer customer = customerRepository.getReferenceById(customerDTO.getId());
   customer.setFirstName(customerDTO.getFirstName());
   customer.setLastName(customerDTO.getLastName());
   // ... repeated for all fields

  customerRepository.save(customer);
}
Note: The CustomerDTO requires some kind of resource identifier. I used the primary key of the database table.
AI has transformed how I work as a technical writer. Large tech companies are developing and sharpening these tools, but some of them are better than others depending on what you want to accomplish. T

I've been writing professionally for 3+ years, and on this personal blog for 5+ years. Throughout this time, I've built a large network made of developers, other technical writers, solutions engineers

I’ve been writing online for almost five years, with a professional focus on technical writing for over two years. If you struggle to create technical content that is easy to digest, this article is for you. Where do I start? If you don’t know where ...

LinkedIn is the only social networking site purposely built to help job seekers. Over the years, LinkedIn has evolved by offering two types of experiences: Job searching Content creation This article will describe how to maximize your LinkedIn fo...

In the last 12+ months as a technical writer, I've worked on several projects highlighting three technical writing elements. This article will introduce you to: Information Architecture Docs-as-code Content strategy Information Architecture (IA)...

On this page
Have you ever come across a Sonar vulnerability issue such as:
Replace this persistence entity with a POJO or DTO object.
This happens when you pass a persistence entity into the @ResponseBody of a REST call instead of a DTO object.
This article will show you how to replace a persistence entity with a DTO object.
You can clone the Github repository using this link.
You'll use this application as a reference.
Let's start.
The Model Mapper is an object mapping library. It makes it easy to convert one object model into another object model.
In the pom.xml, add the Model Mapper dependency:
 <dependency>
    <groupId>org.modelmapper</groupId>
    <artifactId>modelmapper</artifactId>
    <version>2.4.5</version>
</dependency>
P.S: if you ever get any problems after adding the above dependency, running the command mvn clean install usually helps.
Martin Fowler introduced the Data Transfer Object pattern in his book "Patterns of Enterprise Application Architecture".
A Data Transfer Object is an object which carries data between processes.
This object doesn't contain any business logic.
In the src/main/java/com/techwithmaddy/CustomerAPI directory:
Create a new package called dto (all lowercase).
Create a class called CustomerDTO in the dto package.
This class has the following content:
package com.techwithmaddy.CustomerAPI.dto;

import lombok.Data;

@Data
public class CustomerDTO {

    private String firstName;
    private String lastName;
    private String email;
    private String phoneNumber;

}
This converter class is responsible for converting an entity into DTO and vice versa.
In the src/main/java/com/techwithmaddy/CustomerAPI directory:
Create another package called converter (all lowercase).
Create a class called CustomerConverter in the converter package.
This class has the following content:
package com.techwithmaddy.CustomerAPI.converter;

import com.techwithmaddy.CustomerAPI.dto.CustomerDTO;
import com.techwithmaddy.CustomerAPI.model.Customer;
import org.modelmapper.ModelMapper;
import org.springframework.stereotype.Component;

@Component
public class CustomerConverter {

    public CustomerDTO convertEntityToDto(Customer customer) {
        ModelMapper modelMapper = new ModelMapper();
        CustomerDTO customerDTO = modelMapper.map(customer, CustomerDTO.class);
        return customerDTO;
    }

    public Customer convertDtoToEntity(CustomerDTO customerDTO) {
        ModelMapper modelMapper = new ModelMapper();
        Customer customer = modelMapper.map(customerDTO, Customer.class);
        return customer;
    }
}
Use the CustomerDTO instead of the Customer entity database object.
Refactor this class by importing the ModelMapper and the CustomerConverter, and auto-wiring them.
    @Autowired
    ModelMapper modelMapper;

    @Autowired
    CustomerConverter customerConverter;
The saveCustomer() method will now be like this:
    public CustomerDTO saveCustomer(CustomerDTO customerDTO) {
        Customer customer = customerConverter.convertDtoToEntity(customerDTO);
        customer = customerRepository.save(customer);
        return customerConverter.convertEntityToDto(customer);
    }
Add this property to the Rest Controller:
    @Autowired
    private CustomerConverter customerConverter;
And refactor this saveCustomer() method to use the CustomerDTO instead of the Entity class:
@RequestMapping(method = {POST}, path = "/save", produces = MediaType.APPLICATION_JSON_VALUE)
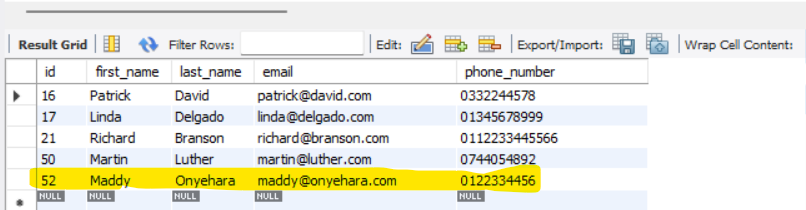
public CustomerDTO saveCustomer(@Valid @RequestBody CustomerDTO customerDTO){
return customerService.saveCustomer(customerDTO);
}
For the purpose of this tutorial, temporarily comment out:
The Rest Controller's GET, PUT, and PATCH requests.
The entire CustomerServiceTest class.
Now you can run the application.

Let's imagine the following scenario:
A school wants to save data about its students. A database stores student names, surnames, emails, and other sensitive information. Teachers only have access to some of the data stored in the database (such as name, surname, and email). The rest of the information won't be accessible and visible to teachers. Teachers can only see the data they need.
Data Transfer Objects store some of the data present in the database with no business logic.
The client communicates with the controller layer in the Spring Boot architecture.
If you didn't have Data Transfer Objects, you would have to use an Entity class in the controller class, creating a vulnerability risk in your application.
Related: Spring Boot Architecture
This article has shown you how to replace an entity with a DTO and use a DTO in the ResponseBody of a REST call.
I hope you've found this article helpful.
Do you know of any other approach? Please let me know in the comments.
Until next time! 🙋🏾♀️
ADDITIONAL RESOURCES