

Spring Boot Architecture

Search for a command to run...
No comments yet. Be the first to comment.
AI has transformed how I work as a technical writer. Large tech companies are developing and sharpening these tools, but some of them are better than others depending on what you want to accomplish. T

I've been writing professionally for 3+ years, and on this personal blog for 5+ years. Throughout this time, I've built a large network made of developers, other technical writers, solutions engineers

I’ve been writing online for almost five years, with a professional focus on technical writing for over two years. If you struggle to create technical content that is easy to digest, this article is for you. Where do I start? If you don’t know where ...

LinkedIn is the only social networking site purposely built to help job seekers. Over the years, LinkedIn has evolved by offering two types of experiences: Job searching Content creation This article will describe how to maximize your LinkedIn fo...

In the last 12+ months as a technical writer, I've worked on several projects highlighting three technical writing elements. This article will introduce you to: Information Architecture Docs-as-code Content strategy Information Architecture (IA)...

This article will explain how the Spring Boot architecture operates.
Let's start.
Spring Boot is built on top of the Spring Framework. It's a more automated and simplified version of Spring.
Spring Boot reduces manual configuration, and through Maven (or Gradle), it makes it easier to resolve dependency conflicts. In addition, Spring Boot has a built-in HTTP server that helps engineers start the application quickly.
Spring Boot makes it easy to create an up-and-running application in a few minutes. You can go to Spring Initializr:

And the website will generate the application for you in an instant.
If you're undecided on whether to learn Spring or Spring Boot, I'd say to at least know the basics of the Spring Framework and then jump onto Spring Boot.
If you've ever tried to write a Java application a time ago, you would have noticed how much work you had to do to perform database operations. It's a tiring process!
The Spring Framework simplifies these operations, thanks to the Spring JDBC module.
Spring is the combination of multiple sub-frameworks. It has many modules, for example, Spring MVC, Spring JDBC, Spring AOP, Spring ORM, and Spring Test. The core feature of the Spring Framework is Dependency Injection.
Even though Spring has made the development of Java applications easier, I think it is vast and complicated to master.
In the past, I tried to learn the Spring Framework from scratch, and I found it a long experience. This is where Spring Boot comes in handy, though. 😁
Now, let's talk about Spring Boot Architecture.
Spring Boot Architecture has four layers:
Presentation Layer
Business Layer
Persistence Layer
Database Layer

This layer is at the top of the architecture. This tier is responsible for:
Performing authentication.
Converting JSON data into an object (and vice versa).
Handling HTTP requests.
Transferring authentication to the business layer.
The presentation layer is the equivalent of the Controller class. The Controller class handles all the incoming REST API requests (GET, POST, PUT, DELETE, PATCH) from the Client.
The business layer is responsible for:
Performing validation.
Performing authorization.
Handling the business logic and rules.
This layer is the equivalent of the Service class. It's where you handle the business logic.
The business logic in software engineering is where you decide what the software needs to do. An example of this is validation. If you are ever requested to validate something, this needs to happen inside the Service class.
The Business layer communicates with both the Presentation layer and the Persistence Layer.
This layer is responsible for the following:
Containing storage logic.
Fetching objects and translating them into database rows (and vice versa).
This layer is the equivalent of the Repository interface. You write database queries inside this interface.
The Persistence layer is the only layer communicating with the Business and Database layers.
This layer is responsible for performing database operations (mainly CRUD operations).
This layer is simply the actual database that you decide to use to build your application.
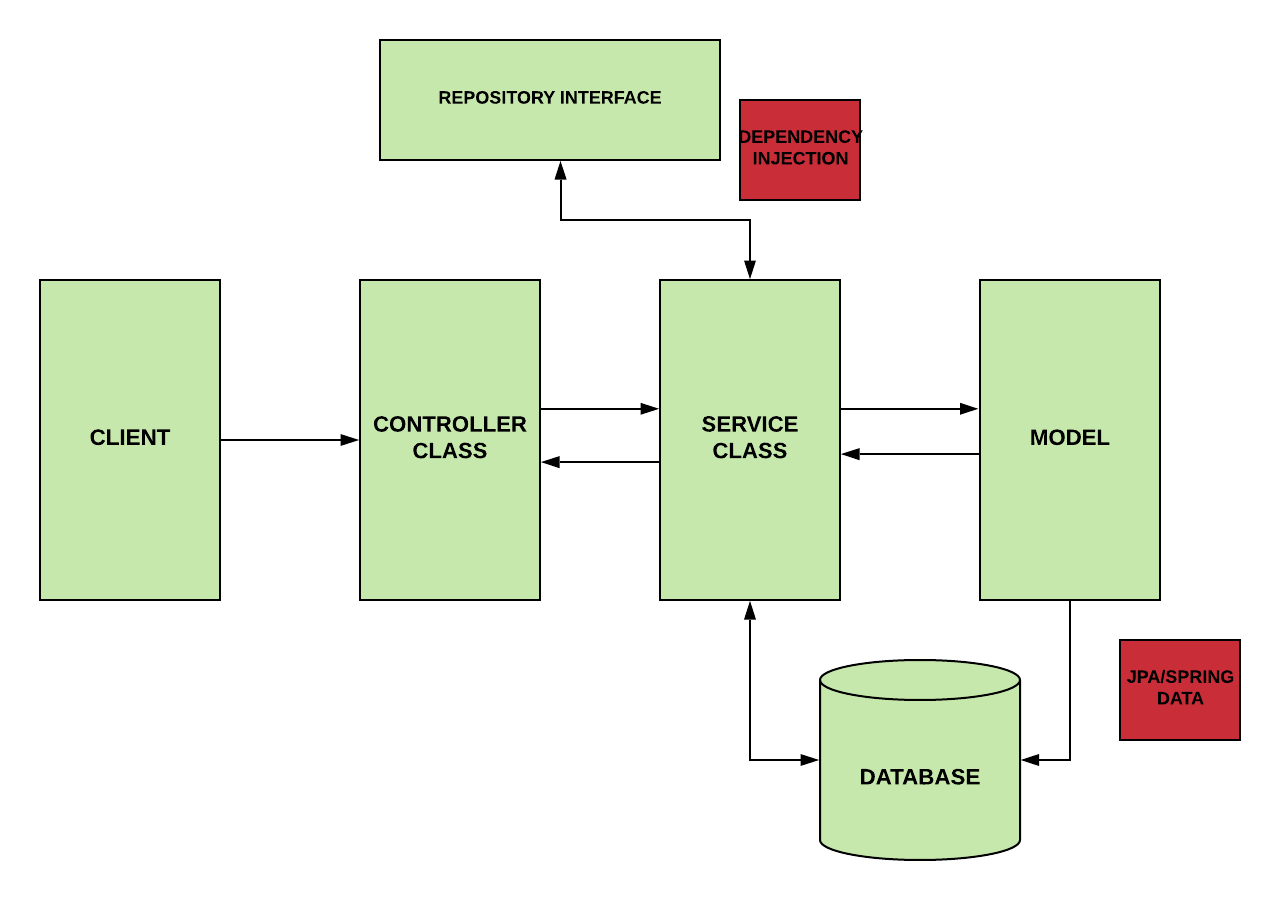
Spring Boot workflow acts like this:
The Client makes an HTTP request.
The Controller class receives the HTTP request.
The Controller understands what type of request will be processed, and then it deals with it.
If it is needed, it calls the service class.
The Service Class is going to handle the business logic. It does this on the data from the database.
If everything goes well, you return a JSP page.
After reading this article, you'll learn about Spring Boot architecture and how it works.
Now learn how to create a Spring Boot Rest API.
Until next time! 👋🏾
ADDITIONAL RESOURCES